Saturday, May 5, 2018

Hybrid integrations with azure components - large file to database on-premise import - Part 3 - call azure data factory pipeline from logica app

In this part, we will create a logic app that'll call the ADF pipeline that we created in part 1 and we'll use the on-premise data gateway that we created in part 2.
(Recently Microsoft released connectors to create and get pipeline runs from a logic app so we don't have to use the azure ad app that we created in part 2)

You can access the previous parts here:

Part 1
Part 2

We'll create a new logic app in the resource group where our azure data factory resides (in my case it's in the hybrid integrations resource group) - (it doesn't have to be in the same resource group, it's just convenient)


  • Go to the resource group
  • click the + add button
  • search for logic app


  • fill in the details as below

  • click the create button
  • once the logic app is created you might get a popup window where you can choose 'go to resource' (otherwise just locate your newly created logic app and click edit)
  • you should have a selection of templates to choose between. I usually start with the http request response template. (easy to pass in parameters and easy to trigger from different clients)
We first want to list files in the folder from where the Azure data factory pipeline import file data to SQL server table (see Part 1). To do this we'll use the file connector action 'list files'.
  • In the logic app designer add an action below the HTTP request trigger.
  • In the search field type 'file system', be patient and then the file system connector appear choose the 'list files in folder' action.

You'll then need to define your connection to your local file system. It needs to know the UNC root folder, credentials to use (don't forget to prefix the username with the domain) and the gateway to use.


Once the connection to your local file system is successfully created you just need to choose the folder where to list files. (in my case it's the same as the root folder so just a front slash)


Now it's time to trigger the Azure data factory pipeline. We'll use the Azure data factory connector to do this. Add a new action below the list file action. Then search for 'Azure data factory', be patient and then the connector actions are displayed choose the 'create a pipeline' run action.


You'll then be asked to sign in to your subscription and when to configure your action as below.


Quite self-explanatory but where do I put the pipeline parameters? As the ADF connector is quite new I think this is just a miss from the product team and it'll soon be corrected but actually, in the 'code view' of your logic app workflow, you can pass in parameters to the pipeline as is shown below.


Under the 'inputs' section of the 'create a pipeline run' JSON definition you can add a 'body' structure that contains the parameters to you ADF pipeline. Hopefully, in the future, you can just do this in the designer pane.
For now, we'll not use the output of the list files action and just use a static filename. Save the logic app and run it. If everything goes well it should trigger your ADF pipeline and import the specified on-premise file data to the on-premise SQL  server table.

Next, we'll improve this solution so it's more production like. The filename will be passed as a parameter to the Azure pipeline run action, we will handle multiple files and delete the files once successfully imported to the database.

Let's start by making our call to trigger a pipeline run more dynamic. Below the 'create a pipeline run' action add a foreach loop and configure its input to be the 'body' output of the list action. Also move the 'create pipeline run' inside the foreach loop.


We need to set the filename dynamically to the output filename we get from the list files action.
  • Switch to code view (might not be needed in the near future) and replace the static FileName parameter as shown below.


We could just delete the file after the 'create a pipeline run' action but we'll not do this since we can't be sure that the import does succeed. Instead, we'll wait until the pipeline run is successful and then delete the file. To do this we need a do until loop and the 'get a pipeline run' action. We also need a variable with the pipeline run status.
  • Below the HTTP request trigger add an action to initialize a new variable of type string.
  • Below the 'create a pipeline run' action inside the foreach loop add an action to set the variable to an initial state (so we can handle multiple files)
  • Finally, add a do until loop (configuration will follow)
  • In the do until loop add an action to 'get a pipeline run'. (you can pick the runid dynamically from the 'create a pipeline run' action)

  • Configure the do until loop as shown below and add a 'delay' action (10 seconds delay) and a 'set variable action' below the 'get a pipeline run' action. Set the variable to the Status field that you'll get dynamically from the 'get a pipeline run' action.

  • Finally, add a 'delete file' action below the do until loop and set the file field to the 'path' variable you'll get dynamically from the 'list file' action.

Now we have a solution where we're able to import an arbitrary number of files and remove the file once successfully processed. (Some minor modifications should be done before going to production. One would need to handle the case then the import to the database does fail. I.e the do until loop times out or returns an error code. So some conditions should be added to the workflow with relevant actions taken in case of failure)

Otherwise, we could now test the happy scenario of importing two files to our database table just by triggering this logic app manually and check the logging. Below is how my final design looks like and a successful run of two imported files.


This is one simple example of how to use a logic app in combination with Azure data factory v2.

Monday, April 23, 2018

Hybrid integrations with azure components - large file to database on-premise import - Part 2 - create azure ad application and install on-premise datagateway

Before we can access the pipeline created in part 1 we need an azure ad application to get authorized to call the Azure service management API that does contain methods to create a pipeline run and check pipeline run status. We need this access to the Azure service management API in order to trigger our pipeline from a logic app which is our ultimate goal.

(As I wrote in part 1 this might not be necessary for future implementations as I've read that the dev team for logic apps does have an ADF connector in the pipe)

But right now it's needed so let's get started. Instead of going through all the detailed steps on how to create an azure ad application you can follow the guidelines in this Microsoft tutorial and if for some reason the link is removed or becomes obsolete you should be able to find a similar tutorial by googling on 'Azure ad application create tutorial'.

Follow the steps in the tutorial below:

How to create Azure ad application

You'll need to give your Azure ad application access to Azure service management API. You do this by setting required permissions on your ad app. Click on 'Azure Active Directory' -> 'App Registrations' and the app you just created (if it doesn't appear, select 'all apps' in the drop-down list)


Then click on 'Settings' -> 'Required permissions' and the + Add button. Search for 'Windows Azure Service Management API' and make sure that you select the delegated permission 'Access Azure Service Management as organization users (preview)'. Save your app changes.


Finally, in order for our ad app to have access to data factory pipelines, we'll add it as a contributor to the Azure subscription. (One should presumably be able to add this access in a more granular way but for simplicity, we'll give the ad app this high-level permission)

In the search field on top of the Azure portal site, type 'Subscriptions' and wait for the drop down result list to appear. Click on 'Subscriptions' and then click the subscription you're working in (in my case I only got one subscription).


Click on 'Access control (IAM)' -> +Add button and choose Role 'Contributor'. Search for your ad app name in the 'Select' field and finally click save.


Our ad app is now finalized and got enough permission to trigger and monitor our pipeline from a logic app.

However, you'll need some values for part 3 in this tutorial (then we create the logic app that'll trigger our pipeline) So I recommend that you collect these values right now, maybe in some notepad type of application.

  • Tenant ID (Called Directory ID in the portal. I found this value clicking 'Azure Active Directory' TAB -> 'Overview' -> listed on top of overview blade)

  • Client ID - (In the portal it's called ApplicationID and you'll find it via: 'Azure Active Directory' -> 'App Registrations' -> the app you just created (if it doesn't appear, select 'all apps' in the drop-down list))
  • Client secret (this one was generated when you created your ad app and you should have stored a copy)
  • Subscription ID (In the search field on top of the Azure portal site, type 'Subscriptions' and wait for the drop down result list to appear. Click on 'Subscriptions' and then click the subscription you're working in (in my case I only got one subscription).)

  • Resource group name (where your data factory resides)
  • Azure data factory name
  • Azure data factory pipeline name
Finally, in order to access files locally on our on-premises file area from a logic app, we need to install Microsoft on-premises data gateway.

I just googled 'azure on premises data gateway download' and got the download link from Google in the first position. So today you can get it here:


Installation is quite simple. Just follow it.

1 - Installation process - set configuration information.


2 - During the configuration phase of the installation you'll need to log into Azure and unless you use a corporate account or a student account it won't allow you. But there's a workaround as I learned during global integration boot camp. You can create a new user in your azure ad that does belong to your azure ad tenant. So do this and assign this user to the contributor role in your Azure subscription.

3 - Create a gateway artifact in a resource group of your choice in your Azure subscription. Be aware that if you do not have a corporate account or student account (see point 2) you'll need to login to your Azure subscription with the azure ad user created in step 2.


Great, now we have all the artifacts we need to tie everything together in part 3 where we'll create a Logic app that'll use the on-premises data gateway and the azure ad application that we just created to trigger and monitor our pipeline. (part 1)

Wednesday, April 18, 2018

Hybrid integrations with azure components - large file to database on-premise import - Part 1 - create azure data factory v2 pipeline

This is a blog series about integration using Azure cloud components. The focus will be on how to combine the different tools available in the azure toolbox to build robust, scalable and cost-efficient integrations that might be challenging or expensive to achieve with a single tool.

For the first chapter in this series, I'll show how you can combine logic apps and Azure data factory version 2 in order to import an on-premise CSV file into an on-premise database.

The integration scenario is that it's a big file around 100MB so you can't use logic apps with on-premises data gateway as the limit is (currently) around 30MB. (Also if it's an on-premise to on-premise integration it doesn't make sense loading up such a large file to Azure datacenter and back again).

In order to allow a logic app to interact with an ADF pipeline one currently needs an azure ad application.

(The logic app team is working on an ADF connector so this part of the blog might quite soon be obsolete - part 2)

There will be 3 parts:

1 - Create the Azure data factory pipeline to import an on-premise flat file into an on-premise database.

2 - Create the azure ad application in order to be able to execute the ADF pipeline from a logic app.
Create the power bi on-premises data gateway in order to be able from a logic app to list files in a folder and to delete files.

3 - Create a logic app that does use all our components in 1 - 3 and tie everything together to finalize the integration.

Let's start creating the Azure data factory. I created a resource group named HybridIntegrations to hold all of the components.

Go to this resource group and click the + button to add an artifact, search for data factory and click create.


Give it a name, choose subscription, resource group (use existing), version v2 (preview) location of your choice (I used west Europe).

Go to the data factory you just created and click the author and monitoring button.
It'll open up another design window. From the rest of part 1, we will work in this design window to create our ADF pipeline.

Per default, you should be in the overview tab of the design window.


On the upper left side from top to bottom you got: a factory symbol, a rectangle with 2 squares (this is your current view/tab), a pencil (this is the actual graphical designer where you can create pipelines and linked services (ie. connections to other systems like file, sftp, SQL, blob storage...)) and a 'watch' / speedometer (where you can get basic execution history and status).

Click on the pencil symbol and when the designer window appears, click the + button and choose pipeline from the drop down. Give it a name in general TAB (csvFileToSQLImport in my case) and define 2 parameters in parameters TAB -> FileName and FileFolder both of type string. We'll use these to make the solution dynamic.


Now expand the 'Data Flow' headline under activities in the designer and drag and drop the Copy activity to the designer blank area. (it's expanded in the image above). We'll now focus on configuring this activity so just click on it.

It's mandatory to configure a source and a sink (as they call the destination, ETL - nomenclature?)
You can give your pipeline a name in general TAB. Then click the source TAB. If this is your first pipeline you won't have any dataset so click the +New button. We'll now basically configure artifacts to pick up the source file.


In the new dataset pane that appears, click the filesystem TAB and choose file system -> finish. You should now have a default named dataset. Give it a meaningful name and click the Connection TAB. You'll presumably not have any linked service so click the + New button and start to configure your new linked service for the file system dataset.


Give it a name, choose the type to be file system and click New in the Connect via integration runtime dropdown.


In the 'Integration runtime setup' pane that appears, choose 'Private network' and next. Give it a name and click next. Finally, click the 'express setup' and follow the instructions. (This will download and install a local integration runtime on the machine you're working on and finally register the runtime in your Azure data factory)


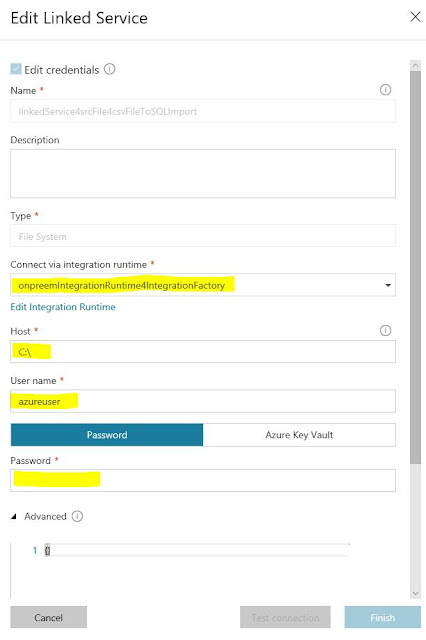
Once your local integration runtime is installed, configured and registered you can go on and finalize your linked service for the file source. You need a user that does have read and list files access to the folder where you want to pick up files. See below for the remaining parameters to fill. On a successful test of your connection click the finish button.


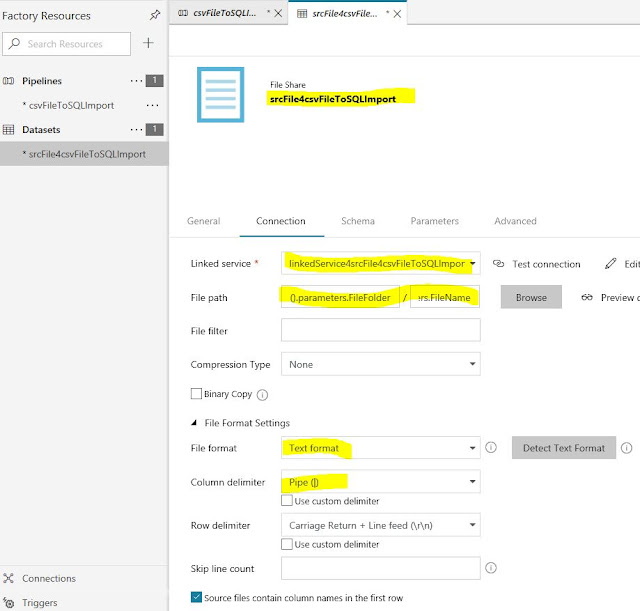
Almost done with the source file dataset configuration. We need to specify folder and file to pick up. You can do this by clicking the browse button and choose a specific folder and file. However, to make this component more reusable we will use the two input parameters to the pipeline that we defined earlier.

So set the folder to @pipeline().parameters.FileFolder and the filename to @pipeline().parameters.FileName 

Additionally, you need to specify the file format. I'm not going into the details here as these settings are standard for flat file parsing, see below.


Almost done ... for the flat file source. Just click the schema TAB and create/define the column names and types for your flat file structure.

Now it's time for the sink (destination) dataset. Click on your pipeline or the pipeline TAB in the designer area. Click on the copy task and on the sink TAB below. Choose new and in the new dataset pane that appears choose databases and SQL server. Click finish.

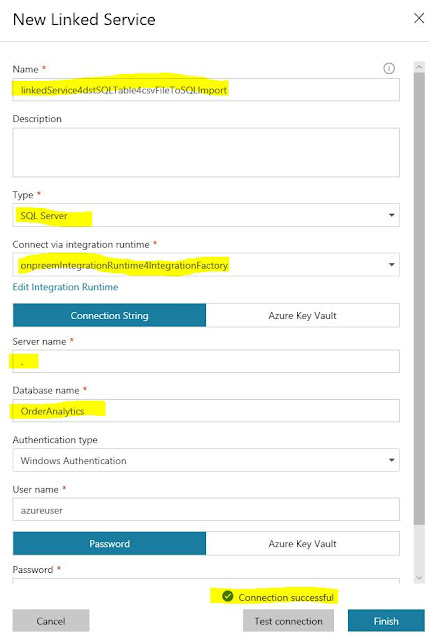
A new design TAB for the sink (destination) dataset will appear. Give it a name in the general TAB. In the connection TAB, click the new linked service button and fill in the values according to your local SQL server installation/database and target table where you want the flat file values to be inserted. (you should now be able to choose the same local integration runtime as you used for the file source linked service)


Once you have connectivity to your SQL connection click finish and choose target table.

In the schema TAB, you can autogenerate the schema for your target table.


We're done ... with the destination connection (the sink).

Just one last thing before we can test this pipeline, let's define the mapping between the source schema and target schema. Click on your pipeline component or the design TAB for your pipeline. Then choose the Mapping TAB and click the import schema button.


Based on your schema names for source and target the designer will try to automap source column names to target column names. You then have the choice to adjust the target columns by choosing items in a drop-down list. (Notice that I had to remove some target columns from the target schema so that source columns matched exactly the number of target columns. Otherwise, the 'mapping' failed even though I unchecked the target columns in my database that had default values)

(This is not much for the T in an ETL engine. (Transform) And it will limit, quite a lot, the real world scenarios that can be handled by the copy task. It's, of course, possible to do custom transformations, but from what I've read so far, it involves spinning up some cloud servers running the transformation processing cycles on Azure virtual machines and as soon as you got VMs involved, your costs are going to run away. But there are ways around this that can be used now. For instance, one can upload the source dataset to a blob and use a function to do the transformation)

We should now be able to test our pipeline and finalize part 1.
Normally you would create a trigger and define an import schedule for the file. To do this you just click the trigger button and choose new/edit. Then follow the steps to define your trigger.

For simplicity, we'll debug our pipeline by clicking the Debug button with the play symbol and enter our custom parameters as below.


If everything goes well you should have some new records in your database table.


Finally, let's do a load test to make sure that this ETL engine delivers. To do this I just added an 'ItemDesciption' column to boost data size in one record and I created a file with a million record. (250 MB). I thought that I would have to wait for some minutes but to my surprise after only 30 seconds the pipeline execution was complete and the records were inserted.


Great but what if you want to delete the source file? Well, it's not really doable out of the box in the designer (at least I haven't figured it out). Googling it will point you to using azure batch services, which involves virtual machines and that means rising costs as I pointed out earlier... However, there's another way to do it that I'll show you in the next 2 parts/post.